
I’ve rounded up some fantastic ideas and tutorials that, in general,
won’t take too long to make. More importantly, though, these projects
are frugal; we know how the bank balance suffers during this time, so
you really shouldn’t be spending too much when you can get your hands
dirty yourself.

This is so easy and cheap it’s almost criminal; and it’s just so damn Christmassy! Simply recycle your old ball ornaments (they’ve run their course, anyway) and use them as mini vases. We think a whole line all the way down the table would look amazing.
DIY Instructions and Project Credit – MammaPaperaIt
 With
some Epsom salts, fresh cranberries and some leafy greenness from your
very own garden, you can construct a stunning centerpiece that isn’t too
in-you-face Christmassy, but that does the job so very well.
With
some Epsom salts, fresh cranberries and some leafy greenness from your
very own garden, you can construct a stunning centerpiece that isn’t too
in-you-face Christmassy, but that does the job so very well.
DIY Instructions and Project Credit – MadiganMade
 I love
the simplicity of this centerpiece; it’s rustic yet elegant, and rather
easy to make – even the box itself! And once you’re festive and
delicious dinner is over, you’ll be surprised at all the other options
and ideas you’ll have for your handmade box.
I love
the simplicity of this centerpiece; it’s rustic yet elegant, and rather
easy to make – even the box itself! And once you’re festive and
delicious dinner is over, you’ll be surprised at all the other options
and ideas you’ll have for your handmade box.
DIY Instructions and Project Credit – TheIdeaRoom
 Once
everyone’s stomachs are full and everyone is peacefully tucked into
their beds, Christmas will be over and there’ll be no need for that
wreath, so you might as well put it to good use for the final home
stretch. If you don’t have fake snow, you can simply use white or silver
spray paint for pretty much the same effect.
Once
everyone’s stomachs are full and everyone is peacefully tucked into
their beds, Christmas will be over and there’ll be no need for that
wreath, so you might as well put it to good use for the final home
stretch. If you don’t have fake snow, you can simply use white or silver
spray paint for pretty much the same effect.
DIY Instructions and Project Credit – TheApronBlog
 These
candles are both elegant and whimsical, and they really are so cute and
Christmassy. Remember, you don’t want too much height I the middle of
the table, so if they look like they’ll be in the way just cut them down
to size and use short candle holders
These
candles are both elegant and whimsical, and they really are so cute and
Christmassy. Remember, you don’t want too much height I the middle of
the table, so if they look like they’ll be in the way just cut them down
to size and use short candle holders
DIY Instructions and Project Credit – MarthaStewartWeddings
 Mercury
glass looks so incredibly elegant thanks to its vintage style. As we
know, though, vintage costs a pretty penny! I’ve got two methods for you
to achieve this look at home: spray paint or gold and silver leaf.
Apply it to vases, bowls or candlesticks to create a dazzling
centerpiece.
Mercury
glass looks so incredibly elegant thanks to its vintage style. As we
know, though, vintage costs a pretty penny! I’ve got two methods for you
to achieve this look at home: spray paint or gold and silver leaf.
Apply it to vases, bowls or candlesticks to create a dazzling
centerpiece.
DIY Instructions and Project Credit – ThisOldHouse and HGTV
 For
a modern and minimalist table setting, this floating candle and
cranberry combination is absolutely perfect. You can use one large low
bowl or, if your table isn’t quite big enough, a selection of smaller,
different sized bowls will look just as good. As they say, variety is
the spice of life!
For
a modern and minimalist table setting, this floating candle and
cranberry combination is absolutely perfect. You can use one large low
bowl or, if your table isn’t quite big enough, a selection of smaller,
different sized bowls will look just as good. As they say, variety is
the spice of life!
DIY Instructions and Project Credit – TheGardener’sEden


So this is possibly one of the cutest and most ingenious festive vase ideas I’ve seen in a while. And of course, the fact that it’s really affordable and uncomplicated to make just makes us love it so much more. You almost don’t even need to add flowers because the vase stands on its own.
DIY Instructions and Project Credit – LivingWellSpendingLess
 You
must have seen these types of ccandle holdersin stores, but you can
actually make them yourself with any plain vases or glasses. With the
help of a printable template, you, too can have these beautiful,
glittery reindeer and trees. Then it’s up to you to fill the glasses
with candles, flowers, dyed water…. Whatever!
You
must have seen these types of ccandle holdersin stores, but you can
actually make them yourself with any plain vases or glasses. With the
help of a printable template, you, too can have these beautiful,
glittery reindeer and trees. Then it’s up to you to fill the glasses
with candles, flowers, dyed water…. Whatever!
DIY Instructions and Project Credit – MarthaStewart
 I love
this one because it is just so classic; the grapevine wreath, red
berries, evergreen greenery and pinecones are what a traditional
Christmas is all about. Oh, and did we mention that it won’t even take
more than 15 minutes to make?
I love
this one because it is just so classic; the grapevine wreath, red
berries, evergreen greenery and pinecones are what a traditional
Christmas is all about. Oh, and did we mention that it won’t even take
more than 15 minutes to make?
DIY Instructions and Project Credit – HGTV
 Here’s
another one that keeps with the traditional theme and only requires a
few minutes of your precious time. You could even add a little spray of
white spray pain on the pinecones to give them that snow-kissed look.
Here’s
another one that keeps with the traditional theme and only requires a
few minutes of your precious time. You could even add a little spray of
white spray pain on the pinecones to give them that snow-kissed look.
DIY Instructions and Project Credit – JuliaBlanner

These little trees are so cute and fun, and so easy and affordable to make. All you need is some cardstock, glue and a variety of sequins to dress up your dinner table.
DIY Instructions and Project Credit – MarthaStewart
 So
what do you really need to make a quick but effective holiday
centerpiece? A few upside-down wine glasses, ball ornaments and candles.
Yep, it’s that simple! You can play around with this idea to display
anything in your makeshift glass dome.
So
what do you really need to make a quick but effective holiday
centerpiece? A few upside-down wine glasses, ball ornaments and candles.
Yep, it’s that simple! You can play around with this idea to display
anything in your makeshift glass dome.
DIY Instructions and Project Credit – AsLongAsIt’sFancy
 These
cloches are easy to throw together using a variety of glasses or jars
that you’ll probably have at home. You also don’t necessarily have to go
out to find cute little figurines to put inside – the photo idea is
really clever and gives it a nice personal touch. If you’re having your
family over, for example, some photos of your previous Christmases
together could really turn up the nostalgia.
These
cloches are easy to throw together using a variety of glasses or jars
that you’ll probably have at home. You also don’t necessarily have to go
out to find cute little figurines to put inside – the photo idea is
really clever and gives it a nice personal touch. If you’re having your
family over, for example, some photos of your previous Christmases
together could really turn up the nostalgia.
DIY Instructions and Project Credit – CountryLiving
 I really
love the uniqueness of this display; it takes a little bit of labor,
but nothing too hectic! This charming centerpiece makes for a great
focal point, and you can simply pick out some of your own favorite
ornaments to dangle from your handmade frame which you can even paint to
match your table settings. The bonus about this one is that it can be
tall if you want, since it doesn’t really obstruct your views of the
dinner guests sitting opposite each other.
I really
love the uniqueness of this display; it takes a little bit of labor,
but nothing too hectic! This charming centerpiece makes for a great
focal point, and you can simply pick out some of your own favorite
ornaments to dangle from your handmade frame which you can even paint to
match your table settings. The bonus about this one is that it can be
tall if you want, since it doesn’t really obstruct your views of the
dinner guests sitting opposite each other.
DIY Instructions and Project Credit – Shanty2Chic
 You
can create some adorable scenes in mason jars of varying sizes to
scatter across the table; you don’t really need to buy that many
supplies because you can really create whatever you want – a bit of fake
snow will make any compilation look festive.
You
can create some adorable scenes in mason jars of varying sizes to
scatter across the table; you don’t really need to buy that many
supplies because you can really create whatever you want – a bit of fake
snow will make any compilation look festive.
DIY Instructions and Project Credit – RhonnaDesigns
 Bust
out some wine glasses and champagne flutes for one our easiest table
decorations; all you have to do it cut our cone shapes from some pretty
scrapbooking paper and rest them on the glasses for these adorable
modern topiary trees.
Bust
out some wine glasses and champagne flutes for one our easiest table
decorations; all you have to do it cut our cone shapes from some pretty
scrapbooking paper and rest them on the glasses for these adorable
modern topiary trees.
DIY Instructions and Project Credit – MadiganMade
 Here’s
a final genius wine glass creation that is just too cute! The lampshade
template, making it super easy, and from there you can decorate them as
you wish, or keep them neutral. Luckily there’s room here for your own
creative flair.
Here’s
a final genius wine glass creation that is just too cute! The lampshade
template, making it super easy, and from there you can decorate them as
you wish, or keep them neutral. Luckily there’s room here for your own
creative flair.
DIY Instructions and Project Credit – PopSugar
 These
burlap-wrapped cones make for fantastic rustic looking little Christmas
trees. Of course, you could paint the burlap in reds or greens or
whatever suits your table, but we quite like the neutral fabric as it
is.
These
burlap-wrapped cones make for fantastic rustic looking little Christmas
trees. Of course, you could paint the burlap in reds or greens or
whatever suits your table, but we quite like the neutral fabric as it
is.
DIY Instructions and Project Credit – DIYNetwork
 I love
the creativity and whimsical elegance of this one (who would have
thought that whimsical and elegant could go together?). Now, we realize
that we’ve warned you about anything standing too tall in the middle of
your table, and we also realize that by definition, a centerpiece should
sit in the center of your table… But this one is just too awesome to
pass up, so I’d suggest putting on the side if one of the ends of the
table is unoccupied.
I love
the creativity and whimsical elegance of this one (who would have
thought that whimsical and elegant could go together?). Now, we realize
that we’ve warned you about anything standing too tall in the middle of
your table, and we also realize that by definition, a centerpiece should
sit in the center of your table… But this one is just too awesome to
pass up, so I’d suggest putting on the side if one of the ends of the
table is unoccupied.
DIY Instructions and Project Credit – CherylStyle
Source: DIY & Crafts
1. Ornament Vases
This is so easy and cheap it’s almost criminal; and it’s just so damn Christmassy! Simply recycle your old ball ornaments (they’ve run their course, anyway) and use them as mini vases. We think a whole line all the way down the table would look amazing.
DIY Instructions and Project Credit – MammaPaperaIt
2. Cranberry Freshness
With
some Epsom salts, fresh cranberries and some leafy greenness from your
very own garden, you can construct a stunning centerpiece that isn’t too
in-you-face Christmassy, but that does the job so very well.DIY Instructions and Project Credit – MadiganMade
3. Simple Candle Box
I love
the simplicity of this centerpiece; it’s rustic yet elegant, and rather
easy to make – even the box itself! And once you’re festive and
delicious dinner is over, you’ll be surprised at all the other options
and ideas you’ll have for your handmade box.DIY Instructions and Project Credit – TheIdeaRoom
4. Snowy Wreath
Once
everyone’s stomachs are full and everyone is peacefully tucked into
their beds, Christmas will be over and there’ll be no need for that
wreath, so you might as well put it to good use for the final home
stretch. If you don’t have fake snow, you can simply use white or silver
spray paint for pretty much the same effect.DIY Instructions and Project Credit – TheApronBlog
5. Tree Candles
These
candles are both elegant and whimsical, and they really are so cute and
Christmassy. Remember, you don’t want too much height I the middle of
the table, so if they look like they’ll be in the way just cut them down
to size and use short candle holdersDIY Instructions and Project Credit – MarthaStewartWeddings
6. Mercury Glass
Mercury
glass looks so incredibly elegant thanks to its vintage style. As we
know, though, vintage costs a pretty penny! I’ve got two methods for you
to achieve this look at home: spray paint or gold and silver leaf.
Apply it to vases, bowls or candlesticks to create a dazzling
centerpiece.DIY Instructions and Project Credit – ThisOldHouse and HGTV
7. Floating Apples
For
a modern and minimalist table setting, this floating candle and
cranberry combination is absolutely perfect. You can use one large low
bowl or, if your table isn’t quite big enough, a selection of smaller,
different sized bowls will look just as good. As they say, variety is
the spice of life!DIY Instructions and Project Credit – TheGardener’sEden
8. Candy Cane Vase
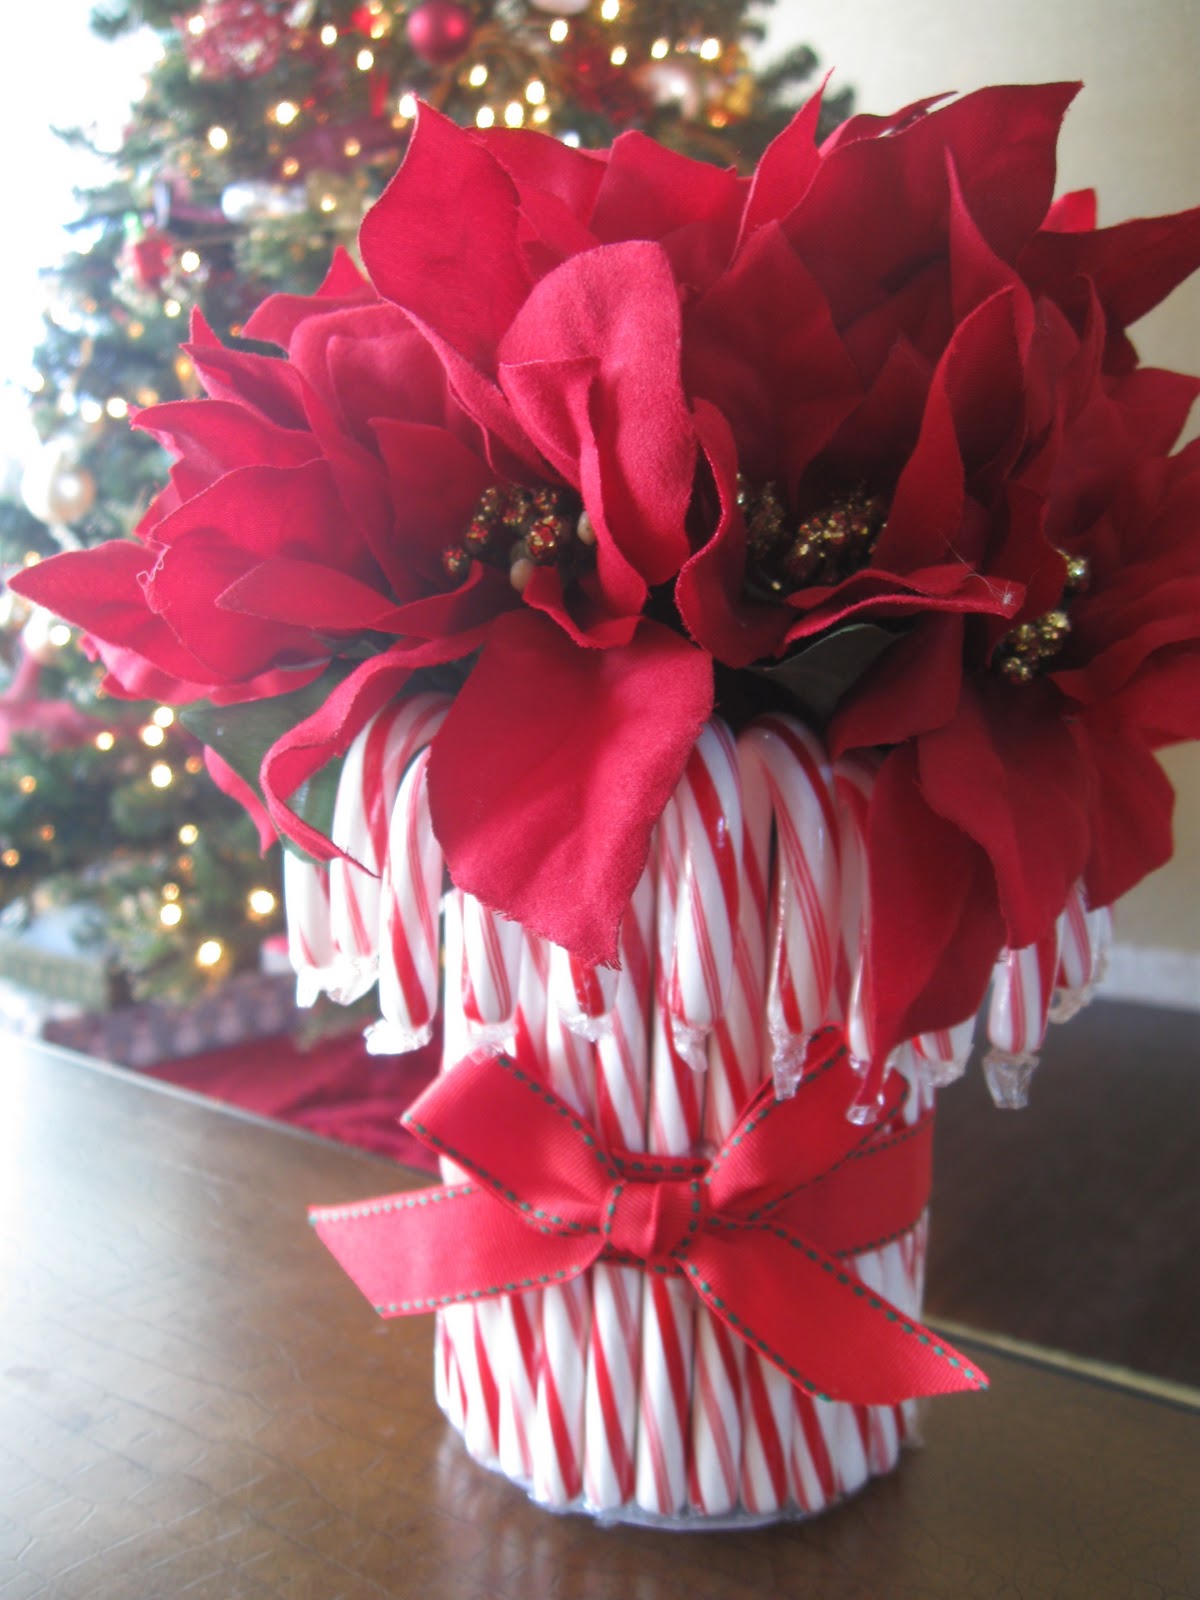
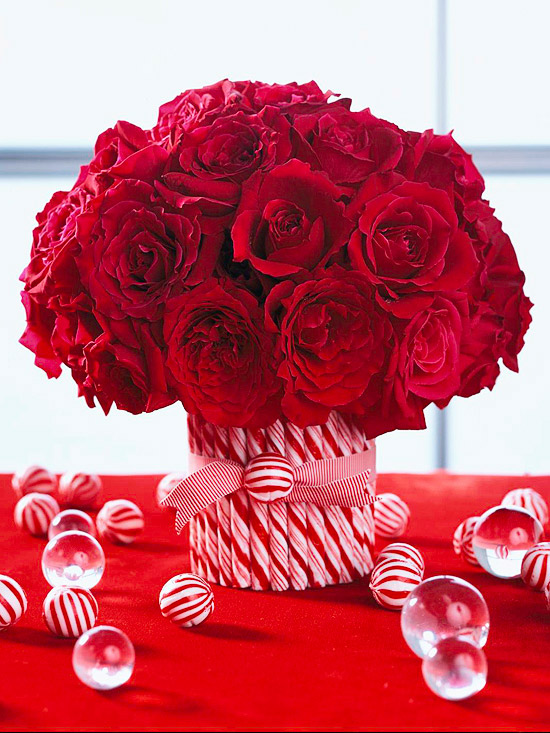
So this is possibly one of the cutest and most ingenious festive vase ideas I’ve seen in a while. And of course, the fact that it’s really affordable and uncomplicated to make just makes us love it so much more. You almost don’t even need to add flowers because the vase stands on its own.
DIY Instructions and Project Credit – LivingWellSpendingLess
9. Glitter Vases
You
must have seen these types of ccandle holdersin stores, but you can
actually make them yourself with any plain vases or glasses. With the
help of a printable template, you, too can have these beautiful,
glittery reindeer and trees. Then it’s up to you to fill the glasses
with candles, flowers, dyed water…. Whatever!DIY Instructions and Project Credit – MarthaStewart
10. Layered Centerpiece
I love
this one because it is just so classic; the grapevine wreath, red
berries, evergreen greenery and pinecones are what a traditional
Christmas is all about. Oh, and did we mention that it won’t even take
more than 15 minutes to make?DIY Instructions and Project Credit – HGTV
11. Pinecone Display
Here’s
another one that keeps with the traditional theme and only requires a
few minutes of your precious time. You could even add a little spray of
white spray pain on the pinecones to give them that snow-kissed look.DIY Instructions and Project Credit – JuliaBlanner
12. Sequined Christmas Trees
These little trees are so cute and fun, and so easy and affordable to make. All you need is some cardstock, glue and a variety of sequins to dress up your dinner table.
DIY Instructions and Project Credit – MarthaStewart
13. Wine Glass Wonder
So
what do you really need to make a quick but effective holiday
centerpiece? A few upside-down wine glasses, ball ornaments and candles.
Yep, it’s that simple! You can play around with this idea to display
anything in your makeshift glass dome.DIY Instructions and Project Credit – AsLongAsIt’sFancy
14. DIY Cloches
These
cloches are easy to throw together using a variety of glasses or jars
that you’ll probably have at home. You also don’t necessarily have to go
out to find cute little figurines to put inside – the photo idea is
really clever and gives it a nice personal touch. If you’re having your
family over, for example, some photos of your previous Christmases
together could really turn up the nostalgia.DIY Instructions and Project Credit – CountryLiving
15. Hanging Ornament Display
I really
love the uniqueness of this display; it takes a little bit of labor,
but nothing too hectic! This charming centerpiece makes for a great
focal point, and you can simply pick out some of your own favorite
ornaments to dangle from your handmade frame which you can even paint to
match your table settings. The bonus about this one is that it can be
tall if you want, since it doesn’t really obstruct your views of the
dinner guests sitting opposite each other.DIY Instructions and Project Credit – Shanty2Chic
16. Christmas Scene
You
can create some adorable scenes in mason jars of varying sizes to
scatter across the table; you don’t really need to buy that many
supplies because you can really create whatever you want – a bit of fake
snow will make any compilation look festive.DIY Instructions and Project Credit – RhonnaDesigns
17. Topiary Trees
Bust
out some wine glasses and champagne flutes for one our easiest table
decorations; all you have to do it cut our cone shapes from some pretty
scrapbooking paper and rest them on the glasses for these adorable
modern topiary trees.DIY Instructions and Project Credit – MadiganMade
18. Mini Lamp Shades
Here’s
a final genius wine glass creation that is just too cute! The lampshade
template, making it super easy, and from there you can decorate them as
you wish, or keep them neutral. Luckily there’s room here for your own
creative flair.DIY Instructions and Project Credit – PopSugar
19. Fringed Trees
These
burlap-wrapped cones make for fantastic rustic looking little Christmas
trees. Of course, you could paint the burlap in reds or greens or
whatever suits your table, but we quite like the neutral fabric as it
is.DIY Instructions and Project Credit – DIYNetwork
20. Rudolph Vase
I love
the creativity and whimsical elegance of this one (who would have
thought that whimsical and elegant could go together?). Now, we realize
that we’ve warned you about anything standing too tall in the middle of
your table, and we also realize that by definition, a centerpiece should
sit in the center of your table… But this one is just too awesome to
pass up, so I’d suggest putting on the side if one of the ends of the
table is unoccupied.DIY Instructions and Project Credit – CherylStyle
Source: DIY & Crafts
No comments:
Post a Comment